Long post coming up!! Brace yourselves!!:))

Spy this..

So, hubby is sometimes asked very nicely by me to help with different projects... I don't do it very often, but there are some things I cannot do, as much as I'd want to!! Back in October I asked him to build some metal legs for a DIY desk I wanted. This was the drawing I gave him:

That was last year in October, right?! Then, "as soon as he could" (that are his words exactly) he brought it home. As soon as May this year... talk about procastinating!!! He didn't do it himself, he asked some handy men over at his job to do it, but it took them around 7 months!!! Yeah... Then, he came home with this:

Here it is sprayed painted gold. I think he did a good job, seven months included and all...:))
At that point I needed the top of the desk. Fortunately I found a small company here that works with wood and asked the owner to make me a butcher's wooden top, 10 cm thick. I had some stain, and as the furniture in the bedroom is white, I thought a dark stain would work great. I wanted a pattern, and ended up doing some stripes... The downsize was that I didn't have painter's tape and I knew it would leak under the tape, but I was fine with that, I didn't want any crisp lines. I have no picture of the natural wood, but you get the idea, here is the top taped and stained:

...left side...

...right side...

..thick, right?!
The following steps included wiping the stain off with a cloth, more staining and rubbing, then taking the tape off:


As you can see the lines aren't even close to perfect. It was ok, though.

Using a small brush I painted the natural stripes with white acrylic paint, I wanted the lines to look even more irregular.

It dried very quickly so I sanded the whole thing with sand paper. Then I applied another generous amount of stain, this time covering all of it, even the lines. I immediately wiped the stain off using a cloth. I did this twice. I wanted a soft look so I chose to seal it with wax. I had Annie Sloan's. First I applied a coat of clear wax, wiped it with a cloth really good, then I finished it with two more coats of dark wax. I love the soft feel of the wood now.

I love the irregular lines...
Now here comes the boatload of image...sorry...a girl's gotta brag...at least I gotta!!:)) I am so proud of this desk, it kinda looks old, someting I really wanted in a room with a lot of Ikea pieces... I only need a sunburst mirror and this desk area is finito!!

Mr. Budha is a new addition and mine is oh, so stylish.. Bling Budha!!
He is wearing a pom-pom necklace I made last year!


The woven stool was spray painted black.

Here are the three boxes under the desk, to hold all nick-nacks:

I made them last night, they have a similar pattern to the one on the desk.

The antler wears blue!!


My Malachite painting holds photos I love.
You can call it my inspiration board...

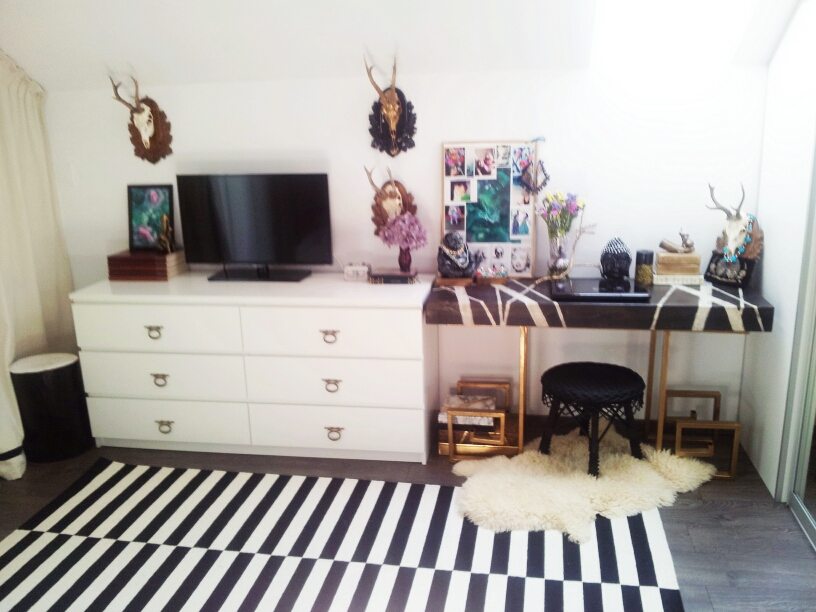
What I see from my bed...

This desk is the softest to the touch.. Only wax gives this amount of softness!!

So this is what I've done, friends!! What say you?? Over and out!!
xoxo,
Ozana
acu m-am prins de felul cum arata biroul tau nu m-am dumirit din prima nu -i vedeam picioarele pe fb foarte interesant multe lucruri frumoase pe el aranjamente interesante tu gasesti o utilitate fiecarui lucru braavoo!!..
ReplyDeleteMultumesc, vcl!! Ma bucur de comentariu!:)
ReplyDeleteGorge desk!! M
ReplyDeleteThanks, M!!
ReplyDeleteAmiga casi me pierdo ese fabuloso Diy , me encanta como se ve ese tablón de madera con las franjas blancas en tu dormitorio
ReplyDeleteMe estoy fascinando con tu decoración
Ay, Angelica, yo tambien amo como me quedo!!
ReplyDeleteKisses!!
WOW! I love it Ozana :-) it's gorgeous and I love how you styled it (love the Budha too) :-) the legs of the legs are gorgeous as well, the design is beautiful and unique! :-)
ReplyDeleteThank you, Ingrid!! There are a few diy projects I truly love, and this is in the top two!!
Deletexo
Ozana, ai facut o treaba minunata! Felicitari din toata inima! Iar ultimele tuse finale, ma refer la aranjamentul de pe masuta, sunt de vis!
ReplyDeleteSpune-mi si mie, te rog, de unde ai luat ceara pt sigilare? As vrea si eu, si n-am gasit, ma gandeam, daca nu merge cu ceara simpla de parchet.
www.piecesofsoul.com
Multumesc, esti o draguta!
DeleteCeara am cumparat o cu ajutorului uneei prietene din America. Este Annie Sloan, in perioada aia vroiam cu disperare sa am vopsea de aia. Se aplica fara a slefui, chiar si pe o baza lucioasa! Cred ca poti incerca pe Amazon, la noi in tara nu e! Si mai sunt si alte tipuri de ceara, mai ieftine, care sunt si ele foarte bune, din cate am citit eu atunci pe net. Mie insa mi se pusese pata pe Annie Sloan..
xo
Ozana
Mersi, o sa ma uit pe net, din pacate nu gasesti mai nimic pt DIY, in tarisoara noastra draga!
DeleteImi place foarte mult scaunelul de nuiele. E super! Te rog mult, daca nu e mare deranjul, sa-mi spui cum l-ai vopsit? Care au fost pasii? Cum ai facut sa dai vopsea peste lacul scaunelului, si sa prinda asa bine. Ai dat cu ceva degresant care "mananca" lacul? Si ce vopsea ai folosit ? Multumesc mult si spor in continuare la cat mai multe proiecte diy !!!
ReplyDeleteBuna, Luisa! Taburetul l am vopsit cu spray, unul ieftin din Dedeman, nimic special. Iar inainte taburetul era natur, nu avea lac aplicat, asa ca nu am pregatit cu nimic scaunul inainte. Pana acum a tinut super, dar a fost folosit doar in casa:)
ReplyDeleteCu drag,
Ozana
Buna, Luisa! Taburetul l am vopsit cu spray, unul ieftin din Dedeman, nimic special. Iar inainte taburetul era natur, nu avea lac aplicat, asa ca nu am pregatit cu nimic scaunul inainte. Pana acum a tinut super, dar a fost folosit doar in casa:)
ReplyDeleteCu drag,
Ozana